One of our favorite preschool pumpkin activities is the Pumpkin Jack experiment, a.k.a. the decomposing pumpkin experiment. It is a super engaging exploration of real life happenings, and what a fun way to explore pumpkin science with kids!
This is perfect for your next preschool, pre-k, or kindergarten pumpkin theme. Although I guarantee even older children will get caught up in the real-time observation of the pumpkin life cycle. At least, that’s been my experience!
You can extend the decomposing pumpkin lesson by using a pumpkin decomposition printable or some type of journal. This will help your pumpkin scientists track the Pumpkin Jack data.

Related: Messy Science Experiments
We’ve done various iterations of this decomposing pumpkin Jack experiment for over 10 years now. I love that it’s something that takes place over a length of time. So the children can truly see, and be focused in on, change over time. And in such a captivating way!
Below, I’ll share some of the ways we’ve explored the pumpkin life cycle in real life. And I’ll share tips and ideas from other teachers as well. Please be sure to grab the free printable recording sheets at the bottom of this post, too!
How to Prep the Pumpkin Decomposition Experiment
First things first, gather the materials you’ll need. This will depend on where and how you’re running the Pumpkin Jack experiment. But here’s a list to get you started (I may get commissions for purchases made through links in this post):
- Pumpkin Jack by Will Hubbell
- Pumpkins (smaller if you’re doing the experiment inside)
- Dirt or potting soil
- Large glass or plastic container with a secure lid (if inside)
- Planter or location in a local garden (if outside)
- Pumpkin carving tools
If you want to do some extra pumpkin explorations and play before the experiment, here are additional items we used:
- Golf tees
- Kid-friendly mallets
- Baking soda
- Vinegar
Once you’ve gathered the materials you’d like to use, it’s time to let the kids explore the pumpkins. At this point, you’ve likely introduced the pumpkin life cycle to the kids and read some great books together. So grab some real pumpkins, of all shapes and sizes if possible, and get to exploring!

Here are some of the things we’ve done before the Pumpkin Jack experiment:
- Let the kids use mallets and kid-friendly hammers to pound golf tees into pumpkins over the course of the week.
- Cut apart the holey pumpkins to explore and discuss pumpkin parts.
- Added baking soda and vinegar to the hollowed-out pumpkins to make foaming pumpkins.
- Carved some jack-o-lantern faces on some pumpkins.
- Let the kids use the pumpkins during play. There was a lot of pumpkin soup making!
Why All the Pumpkin Exploration Before the Pumpkin Science Experiment?
For starters, it really gives the children the chance to fully explore the pumpkins. They get to use most of their senses while doing so. Plus, they can work on their scientific observations and questions! Here are some of the comments heard as we explore the inside of the pumpkins:
- “Ewwwwww! That does NOT feel good!”
- “Why does the whiter pumpkin have oranger insides?”
- “I wonder how many seeds are even in here!”
- “Can we eat the pumpkin seeds, or should we wash them first?”
- “It feels slimy. Really. Slimy!”
A lot of language and vocabulary practice took place at that point, too! Even imaginative play, especially when they were making pumpkin soup.
Additionally, all of this exploration got some of the kids’ germs on the pumpkins. I’m pretty sure that helps the decomposition process along. But I could be wrong!
And, of course, all of this is just plain FUN! I know the children have had a blast over the years. And I’ve certainly enjoyed it every time, too!
Pumpkin Jack Experiment
Now that the children have thoroughly delved into pumpkins, it’s time to to set up the decomposing pumpkin experiment. Before doing that, make sure you’ve chatted with the kids about the concept. Reading the book Pumpkin Jack will help those conversations along!
Then you need to decide where your experiment is taking place. Can you set it up inside? Do you have a spot in the garden for it? Or another place outside? Below are some ways you can run your own Pumpkin Jack experiment. And don’t forget to request the pumpkin decomposition printable at the bottom of this post.
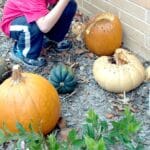
Decomposing Pumpkin Experiment Outside
One option is to use part of your school’s garden for the Pumpkin Jack experiment. Back in 2013, my preschool class and I embarked on an almost year-long pumpkin experiment! If it weren’t for a freakishly rainy summer, I’m sure this experiment would have come to fruition. But, like I tell the kiddos, experiments help us learn even if they don’t turn out like we planned.
After playing and exploring, we set up what the kids dubbed our “smelly pumpkin” experiment. The children and I had talked about decomposition. We talked about what it meant, and what was usually observed during the process. In a patch of the garden near the playground, we placed the remains of our two pumpkins. A few of the other teachers added to the experiment with an old jack-o-lantern, a whole pumpkin, and a small squash. This was right after Halloween, during the first week of November.

Less than a week after we began, one of my students was really into checking out the pumpkins. I told him he could get closer to see what was changing. We got into a discussion about them, and I asked if he thought the smell of the pumpkins would change as they decomposed. He looked at me like I was nuts, then said “no way!” I told him to test it out, so he went up to sniff the pumpkins. Boy, did he prove himself wrong! He was rather excited about the smell, as only a young child could be.
Another Outside Idea for the Pumpkin Science
Of course, not everyone has access to a school garden. But that doesn’t mean you can’t try some form of the Pumpkin Jack experiment outside.
One year, we didn’t have access to a spot in the garden. So we improvised! I located an old planter no one was using in the playground shed. It was long and rectangular. The kids and I moved it to right outside one of our classroom windows.
We added some dirt and placed the pumpkins and pumpkin bits in there. The children were able to stand inside by the window and keep an eye as the decomposition process progressed.
Pumpkin Jack in a Jar Directions
Another alternative is setting up the pumpkin decomposition experiment inside the classroom. If you’ve heard of the pumpkin in a jar experiment, this is probably what you’re thinking of.

This requires a bit more finagling. The outside Pumpkin Jack experiments left a lot up to the weather and nature. If you’re trying this inside, you need to do a bit more. Here are the directions to make your own decomposing pumpkin terrarium:
- Grab a large plastic or glass container that has a secure lid. Make sure your pumpkin can fit through the opening before doing anything else!
- If needed, carefully cut the top off the container to make the hole larger for your pumpkin. This only works with a plastic container.
- Add 4 to 5 inches of dirt or potting soil to the container.
- Place your pumpkin leftovers (carved pumpkin, pumpkin flesh, and seeds) on top of the dirt. Make sure there are seeds!
- Spray some water on everything, but don’t oversaturate.
- Ensure the lid is on securely. If you cut open the top, use packing tape to make sure the container is fully closed.
- Place the container in a sunny window and observe the process!
- As the seed start sprouting, open the container and add more soil as needed. Then re-seal until it’s ready to be planted outside.
How Does the Pumpkin Decomposition Experiment End Up?
As with all science experiments, it can turn out the way you want it to . . . or it can go the other direction. There are so many variables that can interfere with the process. So I suggest reminding your students that it’s about being scientists and seeing what happens.
Back in 2013, the kids checked on the pumpkins throughout the rest of the school year. They’d comment on the smell, the shape, the colors, etc. The “squishiness” was also discussed at length by the children, which I found rather amusing! We were all SO excited when we noticed that the pumpkins had grown sprouts and leaves by the time we returned from Spring Break. I was just as excited as they were, let me tell you!
Since we had summer camps, many of the kids were able to see what happened to the experiment as the summer progressed. We all loved seeing the leaves growing larger, and we were all amazed to see the pumpkin flowers sprout!
If we hadn’t had a crazy amount of rain over the summer, I bet we would have at least a pumpkin or two during the new school year! Unfortunately, the rain pretty much washed out the plants and ended our experiment. Even so, the kids and I really enjoyed watching the life cycle of the pumpkin play out in real time!

Some Tips for Your Pumpkin Jack Experiment
To begin with, I highly recommend discussing the scientific method with your students. You can keep it age-appropriate, of course. But to truly get into a science experiment, you need to touch on the scientific method:
- Question
- Hypothesis
- Test
- Observe
- Analyze the data
- Discuss data and observations
And again, I urge you to discuss with the kids that the experiment might not end in more pumpkins growing. Most children will get wrapped up in keeping an eye on the experiment and being scientists. So they’ll understand!
Have you ever done a decomposing pumpkin experiment or grown pumpkins from seeds? I’d love to hear about it if you did!
More Pumpkin Science Activities for Kids
Here are even more science and STEM ideas for your next pumpkin unit:
If you’re looking for more pumpkin-themed activities, I’d love for you to check out my Pumpkins Pinterest board!
Pumpkin Lesson Plans
Planning meaningful lessons for students week after week while balancing other teaching responsibilities and a personal life can be a daunting task. That’s where Preschool Teacher 101 comes in to save you time!
You’ll find lesson plans, STEM challenges, classroom management guides, dramatic play packs, circle time songs, and so much more. We even have a membership program, The Pack, for preschool and kindergarten teachers. Click on the image below to learn more about our lesson plans all about pumpkins!

Click on the images below to see some of our other great pumpkin-themed resources.


Pumpkin Decomposition Printable Recording Sheets
The Pumpkin Jack experiment printable is available to members of Fun-A-Day’s free email community. If that’s you, enter your email in the form below to request it. If you’re not a member, enter your information in the same form to do so. Then you’ll receive the free printable as a welcome gift!

Originally published October 2013.


This is fantastic. I love that the children have been allowed to watch and experience the de-compostition side of it too. Some much learning value.
Thanks so much, Emma! 🙂 The kids have really enjoyed checking the progress of decomposition. They were just observing everything a few days ago and discovered how much the pumpkins have changed since October. It’s definitely been a great learning experience for them!